Lab Mode Black and White
© UK 2005 Matt Page. 8th April 2005
Introduction
I’ve always like a good black and white image, and have come across many different ways to convert colour images into black and white with Photoshop. I stumbled across this method one day while searching the web for something, and realised I could make a couple of adjustments.
The original idea came from Greg Gorman (www.gormanphotography.com) Click on the “Learn” link, and look for the “Black and White Conversion Tutorial” PDF. The results are just fabulous from this technique!
Changes
The results remain the same, it’s just the execution that I’ve changed. Instead of creating a masked solid colour layer I’ve made use of the “Blend If” layer option, and also turned the whole thing into an action that leaves the original colour image as the background layer.
Step by Step
|
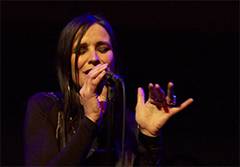
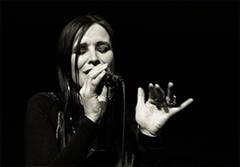
1. Here’s a sample photo (Corinne Drewery from Swing Out Sister at the Jazz Café in London) |
|
|
2. If you are doing this manually, copy the image to the clipboard (Ctrl-A, Ctrl-C) |
|
|
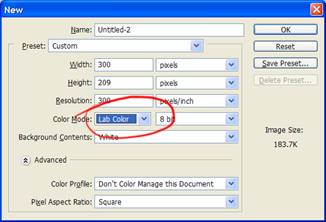
3. Now create a new image (File, New), and change the color mode to “Lab Color”, and click Ok |
|
|
4. Paste the image (Ctrl-V) |
|
|
5. Now, select the Lab channel by pressing Ctrl-1 (you’ll see greyscale) |
|
|
6. Select all (Ctrl-A) and copy to the clipboard (Ctrl-C) |
|
|
7. You can now close this image without saving (Ctrl-F4, N) |
|
|
8. Back on the original image, now paste (Ctrl-V). You should see a new layer appear (which you can rename as appropriate) and the view will be black and white. |
|
|
9. Now the “magic” part: Hold the Alt key down and add a Solid Color layer (from the layers palette). Fill in the values as shown. (It’s the multiply blend mode that’s important) and click OK |
|
|
10. From the colour picker, choose a tone that you want. (I chose a value of #EBDDB2) |
|
|
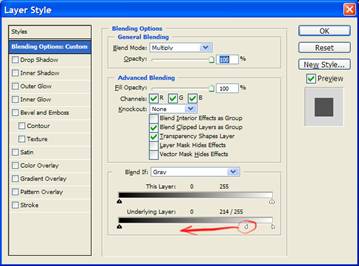
11. Now double click on the “Toning” layer in the layers palette (on the grey area to the right of the word “Toning”) so you get the Layer Style display. 12. You need to change the “Blend If” options for the “Underlying Layer” by holding the Alt key down and dragging the white triangle all the way to the left. The values should show “Underlying Layer: 0 0/255” Click OK to close this dialog. (This step takes the place of the “Select Luminosity” stage in the Greg Gorman guide, and uses no extra memory.) |
|
|
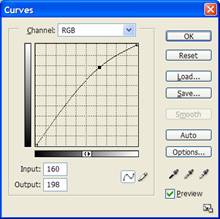
13. Now you can add a curves layer on top to control the brightness and add some contrast (if necessary). For this image I just produced a slight curve shape (In 160, Out 198), but you may need a shallow “S” curve. |
|
|
14. Since the black and white is layered, you can toggle between the colour and black and white version. If you want to save space, ditch the background layer (the original colour image). |
|


Maximising Tonal Range
Here’s a little addendum that I’ve found useful in producing black and white images with good tonal range.
· Add a temporary layer – “Gradient Map”
· You will need to select the “Grey Value Stripes” If you can’t see it listed, press the little circle/arrow in the gradient drop down list, and select “Special Effects”. (The Grey Value Stripes adds an Ansel Adams’ style zoning system.)
· Now your image will be somewhat posterised, however, this posterisation is useful in visualising what tonal values exist in the image.
· Leave this gradient map on the top of the layers
· Now adjust or add the underlying curves, levels etc and you should see the posterisation change as the tonal range changes.
· You are trying to get an image that looks smooth and detailed even when posterised
· When done, simply hide or trash the gradient map.
Final Image
Colour original
Converted Black and White
Have fun!!